This article will provide a guide on how to get your WordPress site onto Cloudflare with cache reserve. Cloudflare is a powerful platform which can enhance your website's performance and security, and setting it up on your WordPress site is relatively simple. With this guide, you will learn the steps involved in registering for a Cloudflare account and configuring the different settings such as caching, security, and analytics.
Why would you use Cache Reserve instead of other Wordpress Caching options?
Speed. There are various stages at which a webpage can be cached:
- The SQL request from the database can be cached.
- Once the page is built, WP Supercache and other plugins can cache the built page.
- The server (apache, nginx, etc) can have a cache built onto it, to server the same response to repeat requests.
- A CDN (Content distribution network) can cache a copy of the response.
Of all these options, the most performant is the CDN because it's the one that doesn't run on your server.
Upgrading server architecture can have huge advantages but it's an expense. It costs time and money. Turning on Cloudflare and configuring Cache Reserve is cheaper on both resources.
So much so that rather than review it's abiltiy, you should just try it. It costs $5 to sample for a month and can be switched on/off easily.
How to use Cloudflare Cache Reserve on Wordpress:
Switching to Cloudflare
Switching to Cloudflare by changing your DNS is one of the most important steps when setting up Cloudflare on your WordPress site. This involves logging in to your Cloudflare account and adding your WordPress website, then configuring the DNS records to point to Cloudflare. By doing this, your site will be routed through Cloudflare and you will be able to take advantage of all the features and benefits that Cloudflare offers.
Cloudlfare offers to copy all your settings when you set it up. Take advantage of this - it's by far the easiest way to flip the switch. As long as you haven't set up anything complex on your DNS this should be the easiest step.
Within a few hours, the change will propogate across the internet and Cloudflare will start serving your content. But it won't cache it - that's the next step!
Setting up Page Cache rules
Next, enable caching in your Cloudflare account. Setting up Page Rules will allow Cloudflare to cache your HTML documents and serve them from the closest data center to the visitor. You'll also need to configure Page Rules to specify which content should be cached.
Go to "Rules" > "Page Rules" from your Website's Dashboard.
Create a rule to cache content based on the URL. To capture ALL of your pages for example.com then the rule match would be *example.com/**. For settings, the important one is called 'Cache Level' which we'll set to 'Cache Everything'. This directs Cloudflare to cache even the HTML documents as by default Cloudflare only caches static assets such as images, your CSS and javascript files.
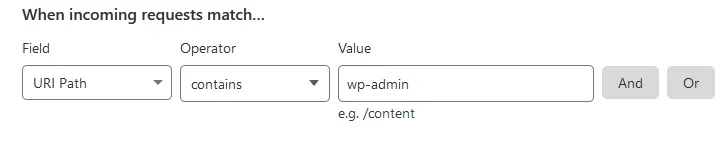
To prevent Cloudflare messing with your wordpress dashboard, you'll need to go to Caching > Cache Rules and create a rule exclude the /wp-admin area from caching. It should look like this:
Enable Cache Reserve
This is the easiest part. To switch on Cache Reserve, go to Caching > Cache Reserve and click the button.
Unless you're looking at millions of hits a month, the most you'll be charged is $5. Realistically you'll be charged far less! Check out their pricing scheme for more details.
Need some help?
If you struggled getting this implemented, you can request help from my consultancy and we'll be happy to assist.